
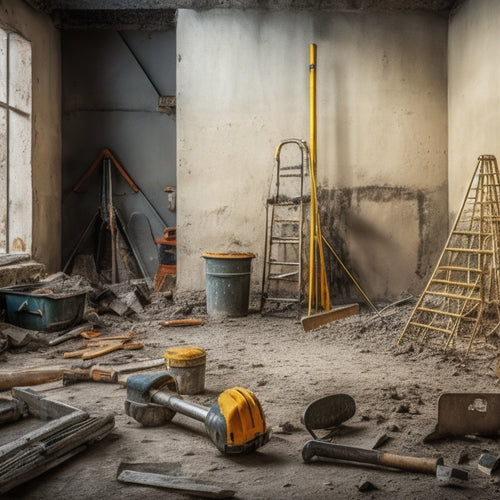
Selecting the Right Tools for Plaster Wall Renovation
You're about to commence a plaster wall renovation project, and the success of your endeavor hinges on having the right tools for the job. Inspect your walls for cracks, sagging, and wear, and gather essential tools like scrapers, chisels, and hammers for demolition, and sandpaper, putty knives, and joint compound for surface preparation. Don't forget safety gear like goggles, face masks, and respirators, as well as measuring devices like laser levels, stud finders, and moisture meters. With the right tools, you'll be well-equipped to tackle every stage of the renovation process - and you'll want to explore each of these stages in more detail to guarantee a professional-looking result.
Key Takeaways
- Inspect walls for cracks, sagging, or unevenness to identify potential water damage or structural issues before renovation.
- Gather essential tools like plaster removal tools, surface preparation items, and demolition tools to ensure efficient renovation.
- Prioritize safety gear and protection, including safety glasses, face masks, and respirators, to prevent injuries and health risks.
- Utilize measuring and testing devices like laser levels, stud finders, and moisture meters to achieve accurate and professional-looking results.
- Choose the right tools for specific tasks, such as cleaning, scraping, repairing, and smoothening, to ensure effectiveness and efficiency throughout the renovation process.
Plaster Wall Inspection Checklist
Get ready to plunge into the plaster wall inspection checklist, an essential step in your renovation journey.
You're about to uncover the common plaster issues that'll make or break your project. Don't worry, we've got your back!
First, inspect the walls for cracks, sagging, or unevenness. These signs often indicate water damage, structural issues, or poor plastering.
Next, check for efflorescence (salt deposits), which can signal moisture seepage. Don't forget to examine the walls for signs of wear, like peeling paint or faded finishes.
Now, it's time to get hands-on! Use inspection techniques like tapping or scratching to identify hollow or loose areas.
You might need to remove some plaster to inspect the underlying lath or substrate. Be on the lookout for signs of pest or rodent damage, too.
By following this checklist, you'll identify potential problems and create a solid plan for your renovation.
Essential Tools for Renovation
You'll need specific tools to efficiently remove old plaster and prepare the surface for renovation.
Your arsenal should include plaster removal tools, such as scrapers, chisels, and hammers, to break away the old material.
Additionally, you'll require surface preparation items, like sandpaper, putty knives, and joint compound, to smooth and ready the surface for finishing.
Plaster Removal Tools
How thoroughly do you need to demolish the existing plaster to achieve a successful renovation? The answer lies in the tools you use and the techniques you employ.
Effective plaster removal techniques require the right equipment to avoid common plaster removal hazards like dust, debris, and structural damage.
To tackle the job, you'll need these essential plaster removal tools:
-
Demolition hammer: A heavy-duty hammer for breaking up the plaster into manageable chunks.
-
Pry bars: Long, flat bars for prying the plaster off the wall, ideal for removing large sections.
-
Chisels: Handheld tools for scraping and chiseling away at stubborn plaster residue.
- Dust-containment systems: Equipment like vacuum attachments or dust masks to minimize the mess and protect yourself from airborne particles.
Surface Preparation Items
After demolishing the old plaster, your walls are left with uneven surfaces, loose debris, and possibly damaged substrates. This makes it essential to prepare the surface properly before applying new finishes. You'll need the right tools to get the job done.
For surface cleaning techniques, you'll require a wire brush or a scraper to remove any remaining debris and old adhesive. A vacuum cleaner or a damp cloth will help to remove dust and dirt. Don't forget a putty knife for scraping and filling holes.
Before applying new finishes, you need to guarantee the surface is even and smooth. This is where a joint compound and a trowel come in handy.
You can choose from various wall texture options, such as knockdown, orange peel, or smooth, depending on your desired finish.
Safety Gear and Protection
When you're working on a plaster wall renovation, you'll be generating dust and debris that can pose serious risks to your health.
You'll need to protect your eyes and face from flying particles, and your respiratory system from inhaling harmful dust and fibers.
Eye and Face Protection
Protective gear is essential for safeguarding your eyes and face from debris and dust generated during plaster wall renovation.
You don't want to end up with a face full of dust or, worse, a serious eye injury. When it comes to eye and face protection, you've got plenty of options.
Here are some must-haves for your safety arsenal:
-
Safety glasses: These are a no-brainer for protecting your peepers from flying debris. Look for ones with shatter-resistant lenses and a comfortable fit.
-
Goggles: If you're working with power tools or doing some serious demo work, goggles will give you added protection from dust and debris.
-
Face masks: These will help keep dust and particles out of your face and eyes. Look for ones with a filter or respirator for added protection.
- Face shields: For extra protection, consider a face shield that covers your entire face. These are especially useful when working with power tools or doing heavy demo work.
Respiratory System Defense
During the plaster wall renovation process, dust and debris can become airborne, putting your respiratory system at risk.
You're not just worried about inhaling a pesky dust bunny; you're concerned about protecting your lungs from serious damage. Prolonged dust exposure can lead to respiratory health issues, and it's essential to take defensive measures.
Invest in a good quality respirator or dust mask that filters out 99.97% of particles as small as 0.3 microns. This will greatly reduce the amount of airborne dust that reaches your lungs. Make sure it fits snugly and comfortably, so you can focus on the task at hand.
Don't forget to change the filters regularly to maintain their effectiveness. You should also consider wearing a disposable dust mask for shorter tasks or when working with particularly hazardous materials.
Your respiratory health is worth the extra precaution, so don't skimp on protection. By taking these measures, you'll be able to breathe easy and focus on getting the job done safely.
Measuring and Testing Devices
Accuracy is essential in plaster wall renovation, and it begins with precise measurements and thorough testing. You can't just eyeball it – not if you want professional-looking results, that is.
To guarantee your walls are straight, level, and smooth, you need the right measuring and testing devices.
Here are some must-haves for your toolkit:
- Laser level: A laser level helps you create a perfectly level surface, which is critical for hanging drywall, installing molding, and guaranteeing your walls are straight.
- Stud finder: This handy tool detects studs behind the plaster, so you can safely drill or nail without hitting any wires or pipes.
- Moisture meter: A moisture meter measures the level of humidity in the walls, helping you identify potential water damage or leaks.
- Infrared thermometer: This device measures surface temperatures, which is useful for detecting areas with inadequate insulation or potential heat loss.
Cleaning and Scraping Tools
With your measurements and tests in hand, you're ready to tackle the physical aspects of plaster wall renovation. Now it's time to get your hands dirty with cleaning and scraping tools. These tools will help you remove old plaster, dust, and debris, revealing a smooth surface for repair.
You'll need a variety of cleaning techniques to tackle different types of messes. For instance, a stiff-bristled brush or a wire scrubber can help remove loose plaster and dirt. For tougher messes, a scraper or putty knife will come in handy. Don't forget to invest in a good vacuum cleaner or dustpan to keep your workspace tidy.
When it comes to scraping methods, you'll want to choose the right tool for the job. A putty knife is perfect for scraping off loose plaster, while a scraper with a curved or angled blade is better suited for removing old adhesive or paint.
Remember to always work in small sections, cleaning and scraping as you go to avoid spreading messes. With the right cleaning and scraping tools, you'll be well on your way to a smooth, renovated plaster wall.
Repairing and Smoothening Tools
Several essential steps lie between the cleaned and scraped surface and a fully renovated plaster wall.
Now it's time to focus on repairing and smoothening the surface to create a strong foundation for the final finish.
To achieve a smooth finish, you'll need the right tools for the job. Here are four essential tools to add to your arsenal:
-
Plaster trowel: A must-have for applying and smoothing plaster, this tool helps you achieve a uniform thickness and texture.
-
Putty knife: Perfect for scraping off excess plaster and filling in small imperfections, a putty knife is a versatile tool that'll get a lot of use.
-
Sandpaper: With various grits to choose from, sandpaper is essential for smoothening out the surface, removing bumps, and creating a surface ready for finishing.
- Float: Used to apply and smooth out plaster, a float helps you achieve a consistent texture and is especially useful when working with different plaster mixing techniques and wall texture options.
Finishing and Texturing Tools
You've prepared your plaster wall surface, and now it's time to add the finishing touches.
Finishing and texturing tools are essential for achieving a professional-looking finish. For texture application, you'll need a texture sprayer, texture gun, or a stomp brush, depending on the desired texture. These tools will help you achieve the perfect finish, from a subtle knockdown to a more dramatic orange peel.
When it comes to finish techniques, you'll need a putty knife, trowel, or a finishing knife to apply and smooth out your finish. A hawk is also handy for holding and applying plaster.
Don't forget a dust mask and safety goggles to protect yourself from the dust and debris generated during the finishing process.
Frequently Asked Questions
Can I Reuse Old Plaster for Patching and Repair Work?
You're wondering if you can reuse old plaster for patching and repair work? Well, it depends on the plaster composition, but generally, you can reuse it if you've got the right patching techniques down pat and the old stuff isn't too degraded.
How Do I Prevent Dust From Spreading During Renovation?
Before you start hacking away, you're smart to prep for the inevitable dust storm. Set up dust barriers to contain the mess, and don't forget air filtration systems to breathe easy - your lungs (and neighbors) will thank you!
What Is the Best Way to Dispose of Old Plaster Debris?
You'll want to bag that old plaster debris tightly, then explore plaster recycling options or safe disposal methods, like designated landfills, to guarantee you're not contributing to a dusty environmental disaster, and can finally breathe a sigh of relief!
Do I Need to Hire a Professional for Complex Plaster Repairs?
If you're not confident in your plaster repair techniques, it's wise to hire a professional contractor, as they'll bring expertise, efficiency, and peace of mind - plus, you won't risk making a mess that's harder to fix than the original issue!
Can I Renovate a Plaster Wall With Water Damage or Mold?
Are you a gladiator ready to tackle that plaster wall? If it's suffered water damage or harbors mold, you'll need to don your hazmat suit and wield a mold remediation strategy before renovating, or risk releasing a toxic tsunami.
Conclusion
You've successfully navigated the process of selecting the right tools for your plaster wall renovation. To recap, a thorough inspection, essential tools, safety gear, and specialized devices are vital for a job well done. For instance, using a putty knife to scrape off old paint and a joint compound to fill holes can make all the difference in achieving a smooth finish, as seen in the renovation of the 1920s colonial home on Elm Street, where the owners were thrilled with the results.
Related Posts
-

Crack Repair Inspection Checklist for Home Renovation
When creating a crack repair inspection checklist for your home renovation project, you'll want to identify crack typ...
-

Why Renovation Waste Disposal Harms the Environment
When you undertake a renovation project, you're contributing to a staggering problem: renovation waste disposal, whic...
-
What Tools to Rent for Block Wall Renovation
When renovating a block wall, it's vital to have the right tools for the job. You'll need demolition tools like pry b...


