

How To Sew A Fabric Bird
Posted by admin on
If you’re looking for an easy sewing project, try this fun fabric bird tutorial by Notches Sewing on YouTube! This can also be good to practice on for beginners, you also don’t need to worry about the materials because this only requires basic sewing tools and a few scrap fabrics.
Materials:
- Garment pattern notcher
- Cardboard
- Main fabric
- Contrasting fabric
- Vanishing ink pen or chalk
- Scissors
- Pins
- Filling
Directions:
Step 1
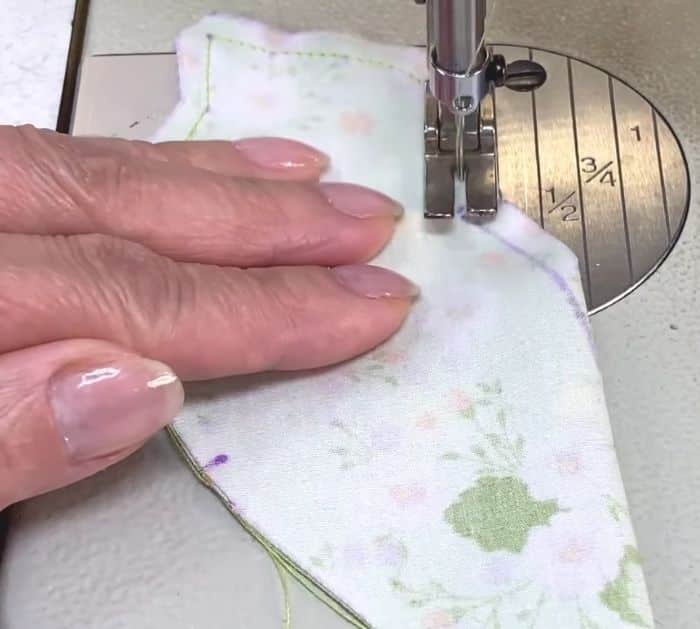
Cut out the printed pattern and transfer it onto cardboard with the markings included. Use the garment pattern notcher to cut out the notches on both pieces, then label the straight edges that need to be placed on a fold. Next, fold your main fabric in half with their right sides together, then place the straight edge of the top pattern piece along the fold. Trace around and mark out the notches with a vanishing ink pen or some chalk, then hold the fabric in place with a couple of pins. Repeat these steps for the bottom pattern piece with contrasting fabric, cut out both pieces as well as the notches to about ⅛ inch or 3mm. Remove all the pins and start stitching from the top-notch below the beak and pivot around the beak, then continue sewing along with the head, then stitch a smooth curve towards the body, sew with ¼ inch or 6mm seam allowance.
Step 2
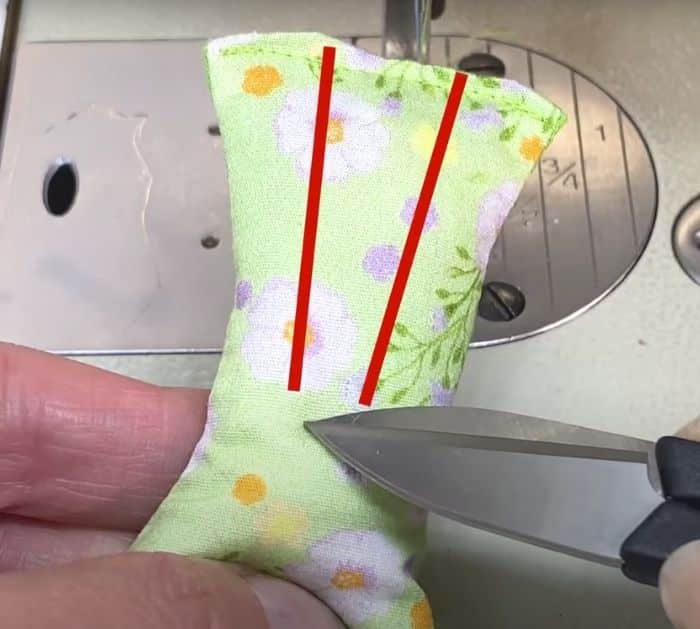
Open up the belly area and place the bottom piece of fabric on top with their right sides together, matching their point/corner together at the top as well as the notches on the sides. Flip it over and sew on the wrong side of the main fabric, stitch the first side starting from the notch, back tacking at the start and finish. Then, flip it around leaving the end of the tail open, and stitch up the other side back tacking at the start and finish. Cut notches at pivot points and the seam at the back making sure not to cut the stitching, trim the seam allowances around the beak on an angle, turn right side out, poke the corners and sides nicely. Fill it with whatever you want, leave the tails with less stuffing so that it’s flatter, then turn in the neds about ¼ inch or 6mm, fold the edges in a slightly curved way, then sew it together to close the opening, and sew two even lines of topstitching on the tail.
*All these images are credited to Notches Sewing via YouTube. Give her channel a visit and subscribe for more!
How To Sew A Fabric Bird
The post How To Sew A Fabric Bird appeared first on DIY Joy.
Related Posts
-
![Target Dorm Room Finds | Cute, Affordable, Essentials To Mark Off!]()
Target Dorm Room Finds | Cute, Afford...
-
![Style Guide to Western Jeans: Ringers Vs Wrangler Vs Ariat]()

Style Guide to Western Jeans: Ringers...
-
![Sleeveless Striped Maxi Dress for $27.99 (was $65.99).]()
Sleeveless Striped Maxi Dress for $27...
-
![J. Crew 50% off Swim, Slub tees and Polos, Allen Edmonds 25% off Factory 2nds, & More – The Thurs. Men’s Sales Handful]()

J. Crew 50% off Swim, Slub tees and P...


